Tuesday, November 4, 2014

Masa Apple Hand Pies with "Eggnog" Icing -gluten free, vegan & top 8 allergen free


After a long break from blogging, I'm back!

Sometimes you gotta step back, take a break from any "extra" activities in life and focus on the family and go after some Autism "issues" at full force!

I'm so happy to be back and share some more Allergy Free treats with anyone who's interested. Now that we survived Halloween, we are ready for the Holiday season and all the changes the weather is going to throw at us here in the beautiful Pacific Northwest!  Bring it.

One recipe we have really been enjoying is our Masa Hand Pies.  We make them savory and sweet. There are endless filling opportunities for Hand Pies, which makes me very happy!  ( It's the little things ) 

So, of course, since we are heading into the pie making season- I figured I should start out with a sweet version first.  Delicious Apple Hand Pies with a Coconut Eggnog Icing.   Yum.  These are best if served fresh, but no one was complaining when we reheated them the next day- just saying.


gluten free, vegan and top 8 allergen free


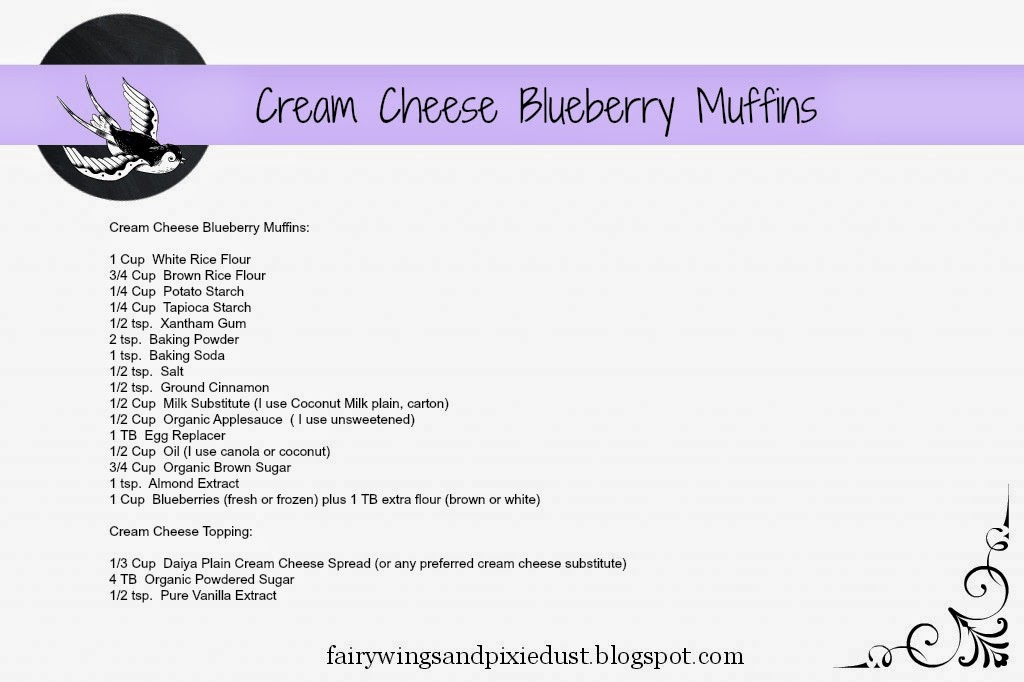
Masa Apple Hand Pies with Coconut Eggnog Icing:
makes 8 Hand Pies


Masa Hand Pie Dough:

1 1/3 Cup Masa Corn Flour
1/4 tsp.  Salt
1 TB  Granulated Sugar (of choice) *can leave out
3/4 Cup  Hot (tap) Water
4-6 TB  Cold (tap) Water

Canola oil for frying

In medium bowl mix masa, salt and sugar together.  Add in hot water and mix until crumbly.  Cover bowl tightly and let set for 30 minutes.   After 30 minutes add in cold water 1 tablespoon at a time until you can form a ball.  I always "mix" with my hands to work in the water.  (You don't want a really wet dough)  Separate into 8 small balls.  Using a tortilla press lined with parchment, press into a 5-5 1/2 inch circle.  Slide you parchment with the masa round into your "form" and fill with 1 heaping spoonful of the cooled apple pie mixture.  Press closed firmly.  I always pinch around the edge with my fingers to insure a sealed edge.  Lay on a tray and cover with a wet towel until ready to fry.  Heat 1/2 inch of oil in pan.  Fry 1-2 minutes on each side until golden brown.  Lay on paper lined cooling tray.  Cool slightly and frost.  Enjoy!

Apple Pie Filling:

2 Apples (of choice)  Pealed and finely chopped
1 TB  Butter  (I use Earth Balance-Soy free butter stick or spread)
1/4 Cup  Organic Brown Sugar
dash of salt
1/4 tsp.  Ground Organic Cinnamon

Over medium heat in a small saucepan melt butter and add in prepared apples and salt.  Cook 5 minutes or so until soft.  Add in sugar and cinnamon and cook additional 5 minutes.  Cool before filling hand pies to fry.

Coconut Eggnog Icing:

1 TB   Coconut Milk Eggnog  (I use So Delicious brand)
1 TB   Butter, softened   (I use Earth Balance-Soy free)
1 Cup  Organic Powdered Sugar
1/8 tsp.  Ground Organic Cinnamon

Mix all ingredients in small bowl until combined.  Ice hand pies once slightly cooled.


Save image to computer and print!


This is the tortilla press I use.  I've tried many, but the
cast iron type works the best.  If you don't have one just
roll out the dough between parchment paper into a
5-5 1/2 inch  round.  *don't forget to line the tortilla press.


I bought a set of these years ago in all different sizes.
 If  you don't have any of these forms, just fold over and
pinch closed and add detail with a fork.


This is how the Masa Dough looks before you cover and
let sit for 30 minutes, very crumbly.


Once you start adding the cold water, mix with hands and the
dough will start to form together with very little water
added.  You don't want a gooey/wet dough.


Form into small balls and press into 5-5 1/2 inches round.


Fill your pressed dough with 1 heaping tablespoon of the apple
pie mixture and seal.  * I just slide the parchment right over
to the form and seal it that way.


I always take a pinch of the dough and test the temperature
of the oil before adding the Hand Pie.


Fry 1-2 minutes on each side.


Once golden brown, cool on a paper towel lined cooling rack.


Once slightly cooled.....ice!


Delicious!


Also shared at:    Gluten Free WednesdayAllergy Free WednesdaysShow and Share WednesdaysFull Plate ThursdayGluten Free FridaysFoodie FridayFat TuesdayCreate Link InspireTotally Talented Tuesdays


Monday, August 4, 2014

Raspberry Cream Cheese Brownies- gluten free, vegan & top 8 allergen free


Brownies, brownies, brownies!  yum!
Raspberry Cream Cheese Brownies....double yum!!

This brownie recipe is simply delicious.
I don't think it needs much explanation, other than you won't be disappointed.
Let me be clear though, the original recipe for the brownies is not my own.  When you find a recipe that is just perfect the way it is and fits your allergy restrictions, there is no need to mess around with it.  I tried many brownie recipes when I first started cooking Allergy Free for my daughter........ so many years ago. Let me just say this recipe was the first to turn out like it says it would and tasted even better.  All I have done is expanded on it.  The recipe comes from a blog called The Sensitive Pantry, which I believe is no longer posting, but if you get a chance check it out, it will inspire you to no end.

If you aren't crazy about raspberries, just substitute your favorite fruit with a complimenting compote.  I can't wait to try blueberries and cherries next!


gluten free, vegan and top 8 allergen free


Raspberry Cream Cheese Brownies:
parchment lined brownie pan   12X8


1 Cup Brown Rice Flour
1/4 Cup  White Rice Flour
1/4 Cup  Potato Starch
1/4 Cup  Tapioca Starch
3/4 tsp.  Xantham Gum
1/3 Cup  Unsweetened Cocoa Powder
1 tsp.  Baking Powder
1/2 tsp.  Salt
3 tsp.  Egg Replacer mixed with 6 TB warm coffee or water
1/3 Cup  Oil of choice (I use coconut or canola)
1/3 Cup  Allergy Free Chocolate Chips (I use Enjoy Life)
1 TB  Pure Vanilla Extract
1/3 Cup  Unsweetened Applesauce
1 1/2 Cups  Organic Sugar

Cream Cheese Topping:

1/2 Cup  Dairy Free Cream Cheese (I use plain Daiya Cream Cheese Spread)
1/4 Cup  Organic Powdered Sugar
1/2 tsp.  Pure Vanilla Extract

Raspberry Topping:

1/2 Cup  Fresh Raspberries
1/4 Cup  Raspberry Jam or Compote


Preheat oven to 350 degrees.  Line brownie pan with parchment paper.  Set aside.
In small bowl whisk together egg replacer and warm coffee/water.  Set aside.  In large bowl add brown rice flour, white rice flour, potato starch, xantham gum, cocoa, baking powder and salt, whisk together, set aside.
In medium microwavable bowl, add chocolate chips and microwave 30 seconds, stir and repeat.  Add oil and stir together until combined.  Add in applesauce, vanilla, egg replacer mixture and sugar and blend well. Add the wet mixture to the dry mixture and stir until combined.  Scrape into prepared pan.  Dollop cream cheese topping and raspberry topping on top of batter.  Using a skewer or knife, drag through batter until swirled.
Place into preheated oven and bake for 30-35 minutes or until a toothpick comes out clean.  Cool and enjoy!


Save image to computer and print!


I like to pre-prep my ingredients before blending them together.


Just use a skewer or knife and swirl through the layers.


Also shared at:  Gluten Free & DIY TuesdayFat TuesdayTotally Talented TuesdayCreate Link InspireGluten Free WednesdayGluten Free FridaysFoodie Friday


Sunday, July 27, 2014

Chocolate Pancakes- gluten free, vegan & top 8 allergen free


Chocolate pancakes, just because..........

No reason, other than we just really wanted a treat!  
We topped ours with a homemade chocolate sauce, which is kind of pudding like and fresh raspberries.  My oldest daughter and husband (who both don't have allergies) topped theirs with some peanut butter, chocolate sauce and raspberries- oh yum!

These truly are more of a dessert than breakfast in my book, but they are fun to make once in a while and delicious to eat!  

Enjoy!


gluten free, vegan and top 8 allergen free


Chocolate Pancakes:

1 Cup  Brown Rice Flour
1/2 Cup  White Rice Flour
1/4 Cup  Potato Starch
1/4 Cup Tapioca Starch
1/4 + 1/8 Cup  Unsweetened Cocoa Powder
1/4 tsp.  Xantham Gum
1/2 tsp.  Salt
1 TB  Baking Powder
1/2 tsp.  Baking Soda
1/2 Cup  Organic Applesauce (I use unsweetened)
1 1/2 TB  Egg Replacer
1/4 Cup  Oil, your choice (I use Coconut or Canola)
1/4 Cup  Organic Sugar (or sweetener of choice)
1 tsp.  Pure Vanilla Extract
1 1/2 Cups  Milk Substitute (I use Rice or Coconut Carton)

In large bowl, whisk together applesauce and egg replacer until smooth.  Add oil, sugar, vanilla and milk, stir until combined.  Next add the dry ingredients, brown rice flour, white rice flour, potato starch, tapioca starch, cocoa powder, xantham gum, salt, baking powder and baking soda.  Whisk until smooth and cook on a greased hot skillet.  Add your choice of toppings.  Enjoy!

Chocolate Sauce:

1 Cup  Coconut (carton) Milk
1/2 Cup  Allergy Free Chocolate Chips (I use Enjoy Life)
6 TB  Organic Powdered Sugar
1 tsp.  Guar Gum    *you can leave this out if you like a thinner sauce

In a microwave safe bowl or on the stove top, heat the coconut milk until warm, but not a boil.  Remove from heat source and stir in chocolate chips.  Cool to room temp.  Use a ice bath for quicker cool down if needed.  Once cooled, whisk in powdered sugar and guar gum (if using).  Serve.


Save image to computer and print!


Just about ready to flip!


I sat my chocolate sauce in a ice bath to hurry the cooling process.


Also shared at:  Gluten Free FridaysFoodie Friday


Monday, July 21, 2014

Cream Cheese Blueberry Muffins- gluten free,vegan & top 8 allergen free


Over the years it's been great to see how many new food substitutes have come out on the market.  In the beginning of my daughters Autism and finding out she had so many food allergies there weren't many options.  

When Daiya came out with their line of cheeses and then cream cheese's it was a relief for one, that she could actually try them and two, I could go to the store and buy a substitute instead of making them.  My list of premade foods for my daughter is VERY limited since she has such a long list of allergies and most of the dairy substitutes are made with soy, which is a huge offender for her.  

If you aren't a fan of the Daiya cream cheese, you can certainly use your own favorite brand of dairy free/allergy free cream cheese or make your own (there are several homemade coconut recipes out there that are delish too!)  

Blueberries and cream cheese are just a natural combination to me and having them in a muffin is a simple way to make a recipe using both!  This muffin recipe would make for a great Brunch addition and are good enough to eat like a cupcake.  I hope you enjoy them as much as we do!


gluten free, vegan and top 8 allergen free


Cream Cheese Blueberry Muffins:

1 Cup  White Rice Flour
3/4 Cup  Brown Rice Flour
1/4 Cup  Potato Starch
1/4 Cup  Tapioca Starch
1/2 tsp.  Xantham Gum
2 tsp.  Baking Powder
1 tsp.  Baking Soda
1/2 tsp.  Salt
1/2 tsp.  Ground Cinnamon
1/2 Cup  Milk Substitute (I use Coconut Milk plain, carton)
1/2 Cup  Organic Applesauce  ( I use unsweetened)
1 TB  Egg Replacer
1/2 Cup  Oil (I use canola or coconut)
3/4 Cup  Organic Brown Sugar
1 tsp.  Almond Extract
1 Cup  Blueberries (fresh or frozen) plus 1 TB extra flour (brown or white)

Cream Cheese Topping:

1/3 Cup  Daiya Plain Cream Cheese Spread (or any preferred cream cheese substitute)
4 TB  Organic Powdered Sugar
1/2 tsp.  Pure Vanilla Extract

Preheat oven to 350 degrees.  Line a 12 cup muffin tin with paper liners.
In small bowl premix cream cheese, powdered sugar and vanilla and place in refrigerator until ready.  Place blueberries in a small bowl and toss with 1 TB of  brown or white rice flour, set aside.
In large mixing bowl with paddle attachment, add applesauce and egg replacer and mix on medium high until combined.  Next add in milk substitute, oil, brown sugar and almond extract. Mix on medium speed until combined.  Add in white rice flour, brown rice flour, potato starch, tapioca starch, xantham gum, baking powder, baking soda, salt and ground cinnamon.  Mix on low until combined scraping down with a spatula when needed.  Stir in "floured" blueberries by hand being careful not to break apart.  Fill paper lined muffin tin 3/4 ways full with muffin mixture.  With a spoon or knife make a "well" to hold cream cheese mixture. Scoop 1/2 TB of cream cheese mixture and place into "well".  Bake 25 minutes or until a toothpick comes out clean.  Cool and enjoy!


Save image to computer and print!


Cream cheese mixture

"Floured" blueberries.

Using a knife or spoon, make a "well" to hold the cream cheese mixture.


Fresh out of the oven.


Yum!


Also shared at:  Fat TuesdayGluten Free and DIY TuesdayTotally Talented TuesdaysCreate Link InspireGluten Free WednesdayAllergy Free WednesdayWaste Not Want Not WednesdayFull Plate ThursdayFoodie FridayGluten Free Fridays


Sunday, July 13, 2014

Fruit & Cream Popsicles- gluten free, vegan and top 8 allergen free


Ready to cool off with a simple treat this summer?

If you have 3 ingredients then you are set to create this easy anytime dessert!
Waiting for them to freeze will be the hardest part......

Getting fruit into my youngest Autistic daughter can be battle ground for us, but luckily she is willing to try it if it's in the form of dessert! 

We always have fun making and creating these delicious fruit and yogurt Popsicles together.  I let her add in special treats to them like allergy free chocolate chips, sprinkles or whatever her heart desires.  Getting her to be creative in the kitchen is such a blessing and a important learning experience.

These simple fruit Popsicles are really quite versatile and you can sub in any fruit you like and any allergy free yogurt that you are able to eat.  You can keep the yogurt out and just focus on the fruit and you will enjoy them just as much!  Or if you would like to make these a little more decadent then add in a bit of dairy free/allergy free ice cream in place of the yogurt and sit back and enjoy!


gluten free, vegan and top 8 allergen free


Fruit & Yogurt Popsicles:
makes 5 Popsicles

2 Cups  Fresh or Frozen Fruit (of choice)   *thaw frozen fruit slightly for quicker blend
1/8 Cup  Sweetener (of choice: honey, maple syrup, coconut palm, sugar, etc.)
1/8 tsp.  Crystallized Lemon Powder (or 1/2 tsp. lemon juice)

1 Carton (6 oz.)  Dairy Free/Allergy Free Yogurt ( I use SO Delicious Coconut brand) any flavor
*add ins:  allergy free chocolate chips, sprinkles etc.


In food processor (or blender) add in fruit, sweetener and lemon and process until completely smooth.
Pour into Popsicle forms 1/4 to 1/2 way, add a dollop of yogurt plus any add ins and repeat until filled to top.  Add Popsicle stick and freeze 3-4 hour until set.  Enjoy!

*note- if using a seedy fruit, you may want to strain before pouring into forms to avoid sensory eating issues.


Save image to computer and print!


Strawberry and vanilla yogurt with allergy free chocolate chips!  


Also shared at:   Gluten Free Fridays,Foodie Friday


Monday, June 30, 2014

S'more Dip- gluten free, vegan and top 8 allergen free


This S'more dip is pretty decadent! 
If you don't have a campfire handy or would just like a different twist on a s'more this is the way to go.  I had some leftover homemade graham crackers and wanted to try something new with them.  

It is actually as quick as making a campfire s'more since you can use your microwave for this simple dessert.  And less hassle than having to make a fire!  

I would have to compare the chocolate dip portion to a marshmallow fluff texture that you could buy in the store.  When creating it I really wanted the dip to have a milk chocolate flavor since my daughter has never really tasted actual milk chocolate.  I know there are chocolate bars out there that are called "milk chocolate" but they don't taste like that to me!  Adding in the Daiya cream cheese spread gives it a little twist and calm down the sweetness factor.

This would be a perfect recipe to throw together for the upcoming 4th of July holiday and your backyard camp-outs this summer.  Adults and kids alike will enjoy this simple treat and no one will be the wiser in knowing that it is allergy free!  

Happy Summer!


gluten free, vegan and top 8 allergen free......


Save image to computer and print!


The consistency is quite thick one all the ingredients are added.


Make sure to get the marshmallows nice and toasty!


Also shared at: Fat Tuesday,Gluten Free & DIY Tuesday,Totally Talented Tuesdays,Gluten Free Wednesday,Waste Not Want Not Wednesday,Gluten Free Fridays,


Monday, June 23, 2014

Graham Crackers - gluten free, vegan and top 8 allergen free


Now that Summer is officially here we had better start gathering our "summer essential" recipes!
Graham Crackers are definitely on the top of my list.  We do a lot of camping and backyard get togethers with the fire pit, so we've got to have our main s'more ingredient checked off our list.

I love this recipe and have been making it for years.  I'm not sure where the original recipe started, but with so many years of cooking these and tweaking it here and there, I have a graham cracker we really love.  It was a pretty easy recipe to adapt to Allergy Free cooking since the non-allergy free version doesn't have many ingredients to really switch.  Always a plus in my book when trying to recreate food!

They, of course, or perfect on their own- but adding a little nut butter and jelly or honey...... or making my sisters favorite with icing isn't to bad either!   This graham cracker is a little softer than your store bought box kind.  But you can always increase the bake time and make them as crunchy as you like.  


gluten free, vegan and top 8 allergen free


Graham Crackers:

1 Cup  Brown Rice Flour
1/2 Cup  White Rice Flour
1/4 Cup  Potato Starch
1/4 Cup  Tapioca Starch
1/4 tsp  Xantham Gum
1/3 Cup  Organic Brown Sugar
1 tsp.  Baking Powder
1/4 tsp.  Salt
1 tsp.  Ground Cinnamon
5 TB  Spectrum Shortening (cold from refrigerator)
1 TB  Honey
2 TB  Molasses
5-6 TB  Milk Substitute ( I use Coconut Milk-carton)
*extra brown rice flour for rolling out dough

Preheat oven to 350 degrees.
In large mixing bowl with paddle attachment add, brown rice flour, white rice flour, potato starch, tapioca starch, xantham gum, brown sugar, baking powder, salt and cinnamon.  Mix on low until combined.  Add in cold shortening and mix on low to "crumble".  Next add in honey, molasses and milk substitute.  Mix on low until combined.  Place dough on parchment paper with a sprinkle of brown rice flour to top and bottom. Place another piece of parchment paper on top of dough and roll out until about 1/8 inch thick.  Using a knife or pizza cutter, score dough and poke gently with fork.  I score my crackers about 3 x 1 1/2 inches.  Place the roll out crackers (with the bottom parchment) onto a cookie sheet and refrigerate 20 minutes then bake 18 - 20 minutes.  The longer they bake the crunchier they will be. Enjoy!


Save image to computer and print!


You can see the dough is pretty "formed" when mixed.


I use a top and bottom piece of parchment to help with sticking and
to keep a smoother look once the graham crackers are cooked.

Just simply measure out or eyeball the cracker size and score with a fork.


Don't forget to refrigerate once scored before baking to "set".


Fresh out of oven!


Also shared at:    Create Link Inspire,Fat TuesdayGluten Free & DIY TuesdayTotally Talented TuesdayTasty TuesdayGluten Free Wednesday,Waste Not Want Not Wednesday,Allergy Free Wednesday,Full Plate Thursday,Gluten Free Fridays,