Tuesday, November 19, 2013

Eggnog Pie


Tis the season of Eggnog!  
And I do love the coconut milk version.  As soon as it comes out I am stocking the fridge with it to put in my morning coffee!

Since there are so many amazing recipes out there for pumpkin pie, I thought I would go a little different route for Thanksgiving.  Why not try a Eggnog Pie?  Ok!

So here is my version of a allergy free Eggnog Pie with Coconut Whip cream.  It is creamy and delicious and quite easy to make.  The best part about coconut eggnog, is that it is not as sweet as original eggnog, which for me, is way to overpowering.  This has a beautiful subtle flavor and the touch of coconut whip cream is just right.


gluten free, vegan....allergy free!

Eggnog Pie:

3 1/2 Cups  So-Delicious (Coconut Milk) Nog
1/4 Cup  Organic Sugar (granulated)
Pinch  of salt
1/2 tsp.  Pumpkin Pie Spice
5 TB  Cornstarch
2 TB  Butter Substitute ( I use Earth Balance, soy free)
1 tsp.  Pure Vanilla Extract

1  9 inch  Pre-baked pastry shell  (my recipe here )
Whipped cream for topping


In small bowl pre-mix 1/2 cup "nog" and all of the cornstarch, set aside.
Over md/high heat in a large saucepan add the remaining 3 cups of "nog", sugar, salt and pumpkin pie spices. Whisk continuously until mixture comes to a soft boil.  Then whisk in slowly the cornstarch mixture and bring back to just a boil.  Remove from heat and stir in butter and vanilla.  Once combined pour into pre-baked shell of choice.  Refrigerate 8 hours or overnight.  Top with favorite whipped cream and enjoy!

*note:  In my experience with homemade puddings it is crucial not to over-boil the pudding mixture, it can cause the cornstarch to "separate" from the ingredients and your pudding will not set up.


Coconut Whip Cream:

1 can (13.5 oz)  Refrigerated Canned Coconut Milk (full fat and drained of water)   *refrigerate 24 hours
4-6 TB  Organic Powdered Sugar
1/2 tsp.  Pure Vanilla Extract
1/2 to 1 tsp.  Guar Gum (if needed)

In a large mixing bowl with whisk attachment add;  drained coconut milk and whip on high for 3-4 minutes. Add in powdered sugar (to taste), vanilla extract and if not setting up, guar gum.  Whisk on high for 2-3 minutes until fluffy.  Serve.  


Save image to computer and print!


Also Shared at:Allergy Free Wednesday,Waste Not Want Not Wednesday,Gluten Free Wednesdays,Gluten Free Fridays,Heeling With Food Friday,Simple Meals Friday,Allergy Friendly Lunchbox,Slightly Indulgent Tuesday,Fat Tuesday


Pie Crust


Here is my basic pie crust recipe!

Very Simple, very basic, but taste great and hold up nicely with any filling you would like to add. 
You can bake it with or without a filling inside, whichever is needed for your recipe.


gluten free/vegan/soy free/nut free


Pie Crust:
1- 9 inch Pie Pan


3/4 Cup  Sweet White Rice Flour
1/4 Cup  Brown Rice Flour
1/4 Cup  Potato Starch
1/4 Cup  Tapioca Starch
1 tsp.  Xantham Gum
2 TB  Sugar (granulated)
1 tsp  Sea Salt (I use fine)
1/2 Cup  Butter substitute or shortening (I use Earth Balance-soy free)   * place in freezer 20 minutes before                   making crust
3-4 TB  Iced Water (a bowl of water with ice in it to keep it extra cold)

In small bowl whisk together white rice flour, brown rice flour, potato starch, tapioca starch and xantham gum.  Set aside 1/4 cup of flour mixture for "dusting" when rolling out dough.  Add mixture to food processor and add in sugar and salt.  Pulse 3 or 4 times until mixed.  Add butter and pulse 6 or 7 times until mixture has a crumb like texture.  Turning on processor, add in water 1 tablespoon at a time until dough just barely forms. Put dough into a large ziplock bag and form into a small disc.  Refrigerate 1 hour.  Once refrigerated remove from bag and place onto a "dusted" piece of parchment paper (using extra flour mixture).  Dust top of dough and place another piece of parchment paper on top and roll out into a 12 inch circle.  Lay gently into pie dish.  Add filling and bake as needed.


* If precooking;  after placing in pie dish, refrigerate 30 minutes.  Preheat oven 350 degrees.  Place a piece of parchment onto dough and weight down (with uncooked beans or rice to avoid extra puffing)  and bake for 20 minutes.  Remove parchment and weight(s), poke gently with a fork and bake an additional 10 minutes.  Cool completely before filling.


Always use parchment and the extra flour to roll out.


You can roll it out as thick or thin as you please.


This technique is used for making mini-tart shells.  Just flip over your
mini muffin tin, grease well and form pie crust over the bottoms.  Refrigerate
until cold and bake at 350 degrees for 12-15 minutes.  Let cool completely
before filling.


Baked mini tarts.


Save image to computer and print!


Also shared at:


Monday, November 11, 2013

Gingerbread Apple Cake


If you love the taste of gingerbread and apple fritter bread, I am hoping you will love this creation of Gingerbread Apple Cake I've come up with.  

I couldn't decide which one to make since I was craving them both, so I put them into one!  

This has a wonderful light gingerbread flavor with the added sweetness of cinnamon apples.
You can bake it all in a loaf pan or in individual muffin tins which would work great if you are having holiday guests.  I was thinking more of a morning gingerbread recipe to enjoy with tea or coffee, but these would definitely work perfect for dessert.  Adding a dollop of whipped coconut cream or even my recipe for pumpkin whip cream would really kick it up a another notch!  


gf/vegan


Gingerbread Apple Cake:
Loaf pan (9x5x3) or 12 cup cupcake pan

1 Cup  Brown Rice Flour                                                            
1 Cup  White Rice Flour
1/3 Cup  Potato Starch
1 tsp.  Xantham Gum
1 tsp.  Baking Powder
1 tsp.  Baking Soda
1/8 tsp.  Fine Sea Salt
2 tsp.  Ground Ginger
1 tsp.  Ground Cinnamon
3 tsp.  Egg Replacer mixed with 3 TB warm water
1/3 Cup  Coconut Palm Sugar
1/3 Cup  Organic Brown Sugar
1/2 Cup  Molasses
1/3 Cup  Spectrum Shortening
1 Cup  Organic Applesauce

1 Apple -peeled, cored and chopped (or sliced if baking in muffin tins)
1 TB  Coconut Palm Sugar
1/2 tsp.  Ground Cinnamon

Glaze:

1 Cup  Organic Powdered Sugar
2 TB.  Coconut Milk (carton) or you favorite milk substitute

Preheat oven to 350 degrees.  Grease pan and set aside.
In small bowl toss together prepared apples, palm sugar (1 TB) and cinnamon (1/2 tsp.), set aside.
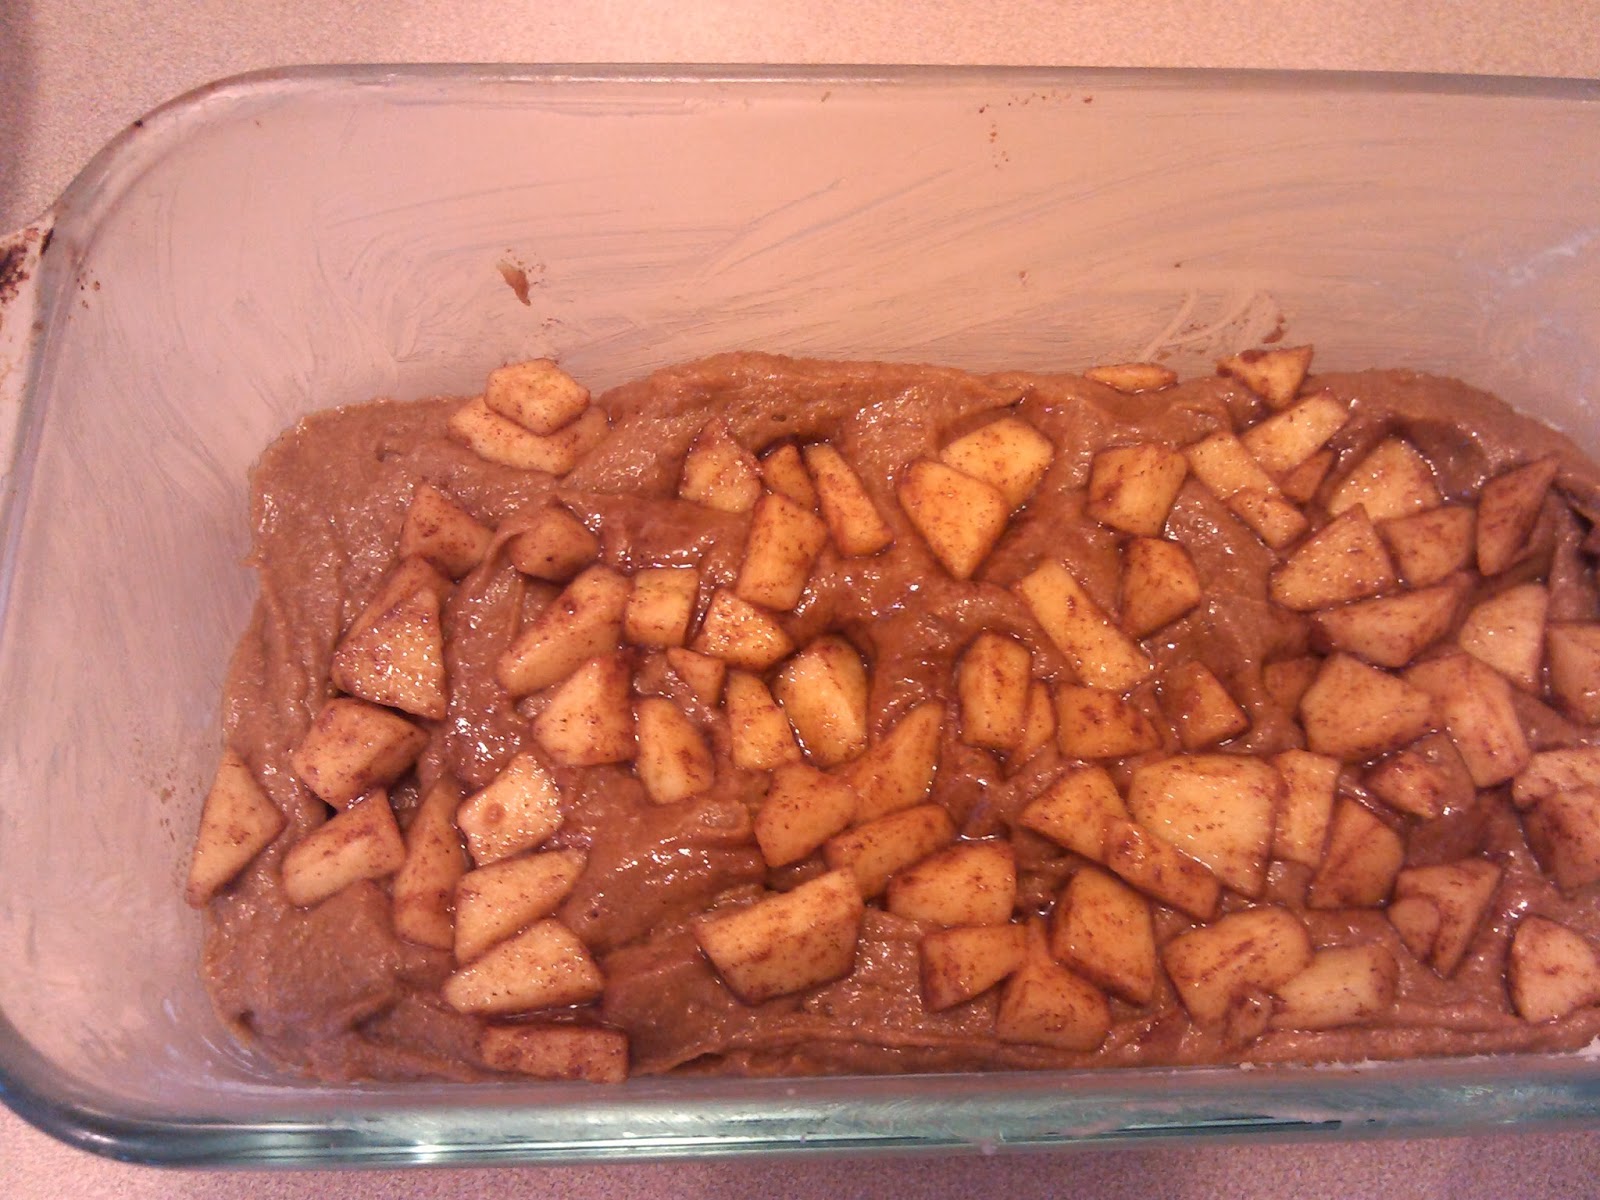
In another separate bowl stir together brown rice flour, white rice flour, potato starch, xantham gum, baking powder, baking soda, salt, ginger and cinnamon.  Set aside.  In mixing bowl with paddle attachment add; prepared egg replacer, palm sugar, brown sugar, molasses, spectrum shortening and applesauce and mix on medium low until well combined.  Slowly add in dry mixture and mix on low, scraping down when needed, until just combined.  Add 1/2 of  the batter to the prepared loaf pan and lightly press in 1/2 of the apple mixture.  Then add the rest of the batter and top with remaining chopped apples, pressing in lightly.  Bake 45-50 minutes or until a toothpick comes out clean.  Cool completely and if desired top with glaze.  Enjoy!
(To prepare glaze, in a small bowl stir together powdered sugar and coconut milk and pour over cooled gingerbread cake)

*If baking in muffin tins- bake at 350 degrees for 18-20 minutes or until a toothpick comes out clean.


Peeled, cored, chopped apples mixed with sugar and cinnamon.


Sugar cinnamon apple slices added to muffin tins.
First 1/2 of batter and 1/2 of prepared apples, pressed lightly in.


Batter added to apple slices.


 Save image to computer and print!


Also shared at:Slightly Indulgent Tuesday,Tasteful Tuesday Party,Fat Tuesday,Allergy Free Wednesday,Gluten Free Wednesday,Waste Not Want Not Wednesday,Healthy 2Day WednesdayGluten Free Fridays,Simple Meals Friday,Healing With Food Friday,Allergy Friendly Lunchbox,Wellness Weekend


Tuesday, November 5, 2013

Pumpkin Pie Whip Cream Shots


So many holiday desserts and so little time!
I love the holiday season.  But most of all, it's the food that gets me every time.
I love to eat.  I want it all, especially on Thanksgiving!  Eat, drink and be merry.
I figured I should at least make one dessert that embodies the holiday spirit, but is light and satisfying.  We (my family) usually have more than one choice when it comes to the dessert portion of the night, and by the time we get to that point in our evening, we are stuffed.  
This dessert is perfect for your holiday dessert buffet,  when you truly want more than just one choice.  

You could serve this up any way you like.  It would easily go in a serving bowl, dessert cup or even better, a juice or shot glass for individual servings.   I will call it my new "side-dessert"!  A compliment to any other heavier main dessert.  This would actually satisfy me after a heavy meal. I wouldn't need anything extra and I would not feel as though I missed out since it filled with a pumpkin pie flavor.  You could even use it as a topping for pies or dense cakes.


So here's to the Holiday Spirit ahead and enjoying all that comes our way!


gf/vegan


Pumpkin Pie Whip Cream Shots:


1 Can  Organic (full fat) Coconut Milk, canned  (13.5 fl. oz.) - refrigerated 24 hours in advance-
3/8 Cup  Organic Powdered Sugar
1/2 tsp.  Pure Vanilla Extract
1 1/4 tsp.  Ground Cinnamon
1/8 tsp.  Ground Nutmeg
3/4 Cup  Organic Pumpkin Puree
1/4 tsp.  Guar Gum (if needed)

Freeze mixing bowl and whisk for 30-60 minutes before preparing.
Drain the coconut liquid from the can of chilled coconut milk.
Add chilled drained coconut milk into pre-chilled mixing bowl.  Add;  powdered sugar, vanilla extract, ground cinnamon and nutmeg.  Whisk on high for 3-5 minutes, until light and fluffy.  Add in pumpkin puree and whisk on high another 2-3 minutes.  At this point if it's not forming soft peaks, add in the guar gum and whisk until set up.  You may need more than the recommended 1/4 tsp.  This will all depend on your type of coconut milk that you use.  (Not all canned coconut is equal, please be aware of the ingredient list!)
Once whisked well, spoon into serving cups, garnish and refrigerate at least a hour before serving.  Enjoy!


*On my serving glasses I melted some Enjoy Life Chocolate Chips in the microwave and "dipped" the glasses into them (some plain-some with sprinkles).  Refrigerate or freeze immediately to set the chocolate for a minute or two, then add the Pumpkin Pie Whip Cream and refrigerate and hour.


Save image to computer and print!


Also shared at:Allergy Free Wednesday,Gluten Free Wednesdays,Waste Not Want Not Wednesday,Healthy 2Day Wednesday,Gluten Free Fridays,Healing with Food Friday,Allergy Friendly Lunchbox,Slightly Indulgent Tuesday,Tasteful Tuesday Party,Fat Tuesday


Tuesday, October 22, 2013

Tater Tots


I don't know what it is about deep fried potatoes I love so much, but I just do!

Back when we got the results on my daughters food allergy tests, it basically ruled out any chance of her having a pre-made meal in a restaurant....ever.  You know the place you get to go where others do the cooking and you sit back and they serve you while the kiddies enjoy their plate of chicken nuggets or burgers and fries?  I'm not even talking about the fast food type, but perhaps a nicer restaurant where you get what you want and they get what they want, and all is good!  

Well, our restaurant days were long gone years ago.  And truthfully it's no skin off my back.  I love to cook.  And I enjoy the fact of not having to get ready to go out and eat, but laying around on our couch enjoying our own food.  It really is quite nice.

When the kids were a bit younger it drove me nuts that I couldn't just go buy some frozen fries (they actually didn't make allergy free ones then) or chicken nuggets etc. and just cook a quick kid fun meal.  So I had to make them myself.  I never thought in a million years I would own a deep fryer,  but I do....and I wouldn't trade it for the world!  (this one here is mine, and it's the bomb) The fact I can make my kids what all the other kids get to eat is a treat.  And on top of that it's made the healthiest way possible.  I can tell you no one complains about my french fries or chicken nuggets!  

Now don't get me wrong, deep fried foods in our house are considered a treat.  We don't do them a lot, but when we do we enjoy them immensely.

So I was thrilled to find a recipe that would transfer over easily to allergy free eating.  I didn't create this recipe I just adapted it and it turned out delicious.  I've looked at a lot of Tater Tot recipes in the past, but all of them contained eggs.  So I just left it alone.
But this recipe doesn't, and the Tater Tots really are good!  They are perfectly crisp on the outside and soft and fluffy on the inside.  My youngest daughter, who looks at anything new as bad, just gobbled them down- shocking to me.  


This is from a wonderful show called Cooks Country and the originally recipe is found here.
I changed a few ingredients, measurements and cooking times, which I will list in my version here.  But please refer to their original recipe, it is quite detailed and perfectly written.  


gf/vegan


Tater Tots:
makes about 25 tater tots


1 Cup  Water
2 tsp.  Fine Sea Salt
2 1/2 lbs.  Russet Potatoes- peeled and cut into 1 inch chunks
1 TB  White Rice Flour
1/2 TB  Potato Starch
pinch of Xantham gum
1/4 tsp.  Ground Pepper
Extra Fine Sea Salt for topping

4 Cups  Frying Oil of choice (Peanut, Vegetable or Canola)  (I use Canola since it is the only one my daughter can have)


In small bowl whisk together the water and salt.  Then in a  food processor; combine prepared potatoes and salt water.  (You may have to do this in two batches like me, since my processor isn't a large one)  Coarsely chop potatoes and salt water for about 10 pulses.  Place processed potatoes into a colander and drain out water by pressing down with a spatula to remove excess.  Place all of the drained potatoes into a microwave safe bowl, stir in the white rice flour, potato starch, xantham gum and pepper.  Cook in microwave on high, until sticky and mushy (mine took about 15 minutes) stirring half way through.  Press cooked potatoes into a parchment lined 8 x 8 baking pan with sides, pressing down flat.  Place into freezer for 15 minutes to cool. Once cooled; lift potatoes out of pan with parchment and cut into small squares, about 5 or 6 cuts in each direction.  In small batches, fry potatoes in oil at 375 degrees for 3-4 minutes or until golden brown.  Remove from fryer and sprinkle with extra salt.  Enjoy!


Save image to computer and print!


Also shared at:Gluten Free Fridays,Simple Meals Friday,Allergy Free Wednesday,Gluten Free Wednesdays,Waste Not Want Not Wednesday,Wellness Weekend,Allergy Friendly Lunchbox Love,Healing Foods Friday


Monday, October 14, 2013

Pumpkin Whoopie Pies


Since I haven't been making much in the cookie department lately I thought it was time to do it up!   And since we are in mid-Fall, we should consume as many pumpkin baked goods as we  possibly can.....sounds reasonable to me!

So lets make Pumpkin Whoopie Pies with Maple Butter Cream Frosting.  
Why you ask?
Because these are a soft cake-like cookie, with a touch of fall spices and a hint of pumpkin flavor. And to make these even more delicious I sandwich them with a maple butter cream.

It is so fun to make a dessert that is easy, but nice enough to serve to company, kids and adults alike.  And when you make one that you don't need to excuse as "allergy free" makes it even better.  I truly hope you enjoy!


gf/vegan


Pumpkin Whoopie Pies:
Parchment lined cookie pan or non-stick Whoopie Pie pan
oven: 350 degrees
Qty.: 30 cookies or 15 Whoopie Pies


3 Cups  GF Flour (1 1/2 Cup White Rice Flour+1/2 Cup Brown Rice Flour+1 Cup Potato Starch)
1 tsp.  Xantham Gum
2 tsp.  Baking Powder
1 tsp.  Baking Soda
1/2 tsp.  Fine Sea Salt
2 TB.  Ground Cinnamon
1 tsp.  Ground Ginger
1/2 tsp.  Ground Nutmeg

1/2 Cup  Organic Brown Sugar
1/2 Cup  Organic Granulated Sugar
3/4 Cup  Oil  (liquid)
3 tsp.  Egg Replacer mixed with 4 TB warm water
2 Cups  Organic Pumpkin Puree (cold)
1/4 Cup  Milk Substitute (I use Rice Milk-plain)
1 tsp.  Pure Vanilla Extract

Preheat oven to 350 degrees.  Prepare baking pan(s) and set aside.
In small bowl whisk together; gluten free flour mixture, xantham gum, baking powder, baking soda, salt, cinnamon, ginger and nutmeg.  Set aside.
In large mixing bowl with paddle attachment add; brown sugar, granulated sugar and oil.  Mix on medium-low speed until well blended.  Scraping down with spatula when needed.  Next add in pumpkin, egg replacer mixture, vanilla and milk substitute and mix on low until combined.  Add in dry mixture on low speed, scraping down with a spatula when needed, and mix until just combined.   Spread cookie dough onto prepared pan(s) making a 2 inch to 3 inch circle.  Smooth top of dough with a wet knife, if desired, to make a flatter, smoother whoopie pie cookie.  Bake 10 minutes or until a toothpick comes out clean.  Cool completely before icing.


Maple Butter Cream Icing: 


1/4 + 1/8 Cup  Butter Substitute (I use Earth Balance, soy free)
1/4 + 1/8 Cup  Spectrum Shortening
pinch of salt
2 1/4 Cup  Organic Powdered Sugar
2 1/2 TB  Pure Maple Syrup
1/2 TB  Coconut Milk (carton)

In a large mixing bowl with paddle attachment add; butter, shortening and salt and mix on medium speed until well blended and soft.  Add in powdered sugar, maple syrup and coconut milk and mix on medium low speed until well combined, about 2 minutes scraping down as needed, it will become light and fluffy.  Pipe or spread onto whoopie pie.
Enjoy!


Smoothing the top with a wet icing knife....


Save image and print!


Also shared at:Slightly Indulgent Tuesday,Tasteful Tuesday Party,Fat Tuesday,Allergy Free Wednesday,Gluten Free Wednesday,Waste Not Want Not Wednesday,Gluten Free Fridays,Healing with Food Friday,Allergy Friendly Lunchbox Love

Monday, October 7, 2013

BBQ Chicken Cornbread Bake


This is one of those go-to meals that I've used on several occasions.  It consists of pretty basic ingredients and can be thrown together in about a hour.  It is large enough if you have company to feed or plenty enough just to enjoy the leftovers.  I love having recipes that can carry over to another night without loosing their flavor or texture.... (so I can have a night off from cooking!).

I originally found this recipe off of the Rachael Ray website over a year ago (I couldn't find the link anymore otherwise I would have shared!) and just recreated it so I could make it allergy free for my family.  

The only thing I change from my recipe version when making it from time to time, is if I use real cheese or cheese substitute depending on who I am feeding.  Every other part of the recipe I don't have to worry about since I use all allergy free ingredients.  

We normally top it with freshly mashed avocado's with a little bit of smoked sea salt mixed in.  But the toppings ideas could be endless.  When serving to company, I would also put out salsa, hot sauce, sour cream, cilantro etc.  I would normally serve this with a fresh cucumber salad on the side.  


gf/vegan


BBQ Chicken Cornbread Bake:
Oven 350 degrees
9x13 Pan (greased)


Cornbread:

1 Cup  Masa or Cornmeal
1/2 Cup  Brown Rice Flour
1/2 Cup  Tapioca Starch
1 tsp.  Xantham Gum
1 TB  Baking Powder
1/4 tsp.  Fine Sea Salt
1/4 plus 1/8 Cup  Oil ( I used Canola)
1/4 plus 1/8 Cup  Pure Maple Syrup
1 1/2 Cups  Milk Substitute ( I used plain unsweetened Rice Milk)
1/2 Cup  Corn ( I used thawed frozen corn)


Preheat oven to 350 degrees.  Grease a 9x13 pan, set aside.
In a large mixing bowl;  add all ingredients except corn, and stir by hand until well combined.  Once combined, stir in corn.  Place into greased 9x13 pan and bake 25-30 minutes, until a light golden brown.
Remove from oven and set aside until bbq chicken mixture is ready.

BBQ Chicken Topping:


2-3 TB  Olive Oil
1/2  Medium Yellow Onion (chopped)
1/4  Green Bell Pepper (chopped)
1/4  Red Bell Pepper (chopped)
2  Garlic Cloves (minced)
3 Cups  Shredded Chicken (I shredded 1/2 of a whole roasted chicken)
1 Cup  BBQ Sauce ( I used Two Fat Guys brand)
1/4 Cup  Ketchup
1 TB  Chili Powder
2 tsp.  Ground Cumin
salt and pepper to taste

1 1/4 Cups Cheese of choice ( I used a Daiya mixture of shredded cheddar and mozzarella, the Daiya shredded pepperjack would be delicious too)
  (*note:  For my real cheese eaters, I top with a mixture of 1 cup shredded cheddar and 1/4 cup shredded peperjack cheese)

Preheat oven to 350 degrees.
In large skillet over medium high heat on stove top;  add olive oil, yellow onion, green pepper, red pepper and garlic and saute until soft (4-5 minutes)  Add in shredded chicken, bbq sauce, ketchup, chili powder, cumin and salt and pepper (to taste).  Stir together and once evenly heated, remove from heat and top the precooked cornbread mixture with all of the bbq chicken mixture.  Top with cheese evenly and bake (covered) for 15 minutes or until cheese is evenly melted.  Remove cover and broil top until golden, 2-3 minutes.  Enjoy!


Although Daiya doesn't melt as well as dairy cheese, it is still delicious!
You can see the layers of sweet cornbread, bbq chicken and cheese......
You can also make this into individual servings if you like!


This is be real cheese version for all the dairy eaters!   


Save and print!


Also shared at:Slightly Indulgent Tuesday,Tasteful Tuesday Party,Fat Tuesday,Allergy Free Wednesday,Gluten Free Wednesdays,Waste Not Want Not Wednesday,Healthy 2Day Wednesday,Gluten Free Fridays,Healing With Food Friday,Simple Meals Friday